Friday, March 29, 2013

Pork Medallions in Caribbean Nut Sauce

Dishes from the Caribbean often feature a fusion of flavors from all over the world. This recipe has Asian, Indian, and tropical influences, between the soy sauce, curry powder, and coconut milk. The ingredient list looks long, but almost half of the items are ground spices, so fret not. If you don't have - or don't like - Match pork, try this recipe with tempeh.

Ingredients:
  • 6 peeled garlic cloves
  • 4 teaspoons peeled and chopped fresh ginger
  • 2 teaspoons cumin seeds
  • 1/4 teaspoon curry powder
  • 1/4 teaspoon crushed red pepper
  • 1/4 cup unsalted dry-roasted peanuts*
  • 1 tablespoon hot water
  • 12 ounces Match pork, thawed
  • Cooking spray
  • 2 tablespoons low-sodium soy sauce
  • 6 tablespoons water, divided
  • 2 cups thinly sliced red onion
  • 3 tablespoons light coconut milk
  • 1 tablespoon vegan brown sugar
  • 1/2 teaspoon salt
  • 1/8 teaspoon black pepper
  • 4 cups hot cooked long-grain rice
1. Place the garlic cloves in a food processor and process until minced.  Add the ginger, cumin, curry, and crushed red pepper, and process until blended.  Add the peanuts and hot water; pulse until well blended, scraping down the sides of the bowl as needed.


2. Cut the pork into 8 pieces (about 1-inch thick).  Place the pieces between 2 sheets of plastic wrap and flatten with a meat mallet until about 1/2-inch thick.


3. Heat a large skillet over medium-high heat.  Coat the pork pieces with cooking spray and add to the pan; saute for 2 minutes on each side.  Transfer to a shallow bowl.

4. Add the soy sauce and 2 tablespoons water to the pan, scraping to remove any browned bits. Pour the soy sauce mixture over the pork pieces and set aside.

5. Add the red onion to the pan and saute for 3 minutes.  Add 1/4 cup of the ground peanut mixture; cook for 4 minutes.


6. Stir in the remaining 4 tablespoons water, the coconut milk, brown sugar, salt, and black pepper.  Return the pork and soy sauce mixture to the pan and bring to a boil.  Reduce heat and simmer for 1 minute.

7. Meanwhile, prepare the rice according to package directions.  Combine the remaining ground peanut mixture (about 1/4 cup) with the cooked rice.


8. Spoon 1 cup rice onto each of 4 plates.  Top each serving with 3 ounces pork and 1/2 cup of the onion sauce.


*Don't forget to check ingredient lists carefully when buying dry-roasted peanuts. Some brands - such as Planter's - use gelatin, though it baffles me as to why. A sure bet is to buy dry-roasted peanuts from nutsonline.com

Nutrition Info:
4 servings (3 ounces pork, 1/2 cup sauce, 1 cup rice), Calories 460

Tasting Notes:
Quite an intriguing blend of flavors, whether the soy-coated pork pieces, the toasted cumin against the backdrop of the cooked rice, or the subtle bits of peanuty peanut and fresh ginger in the sauce. The onions were very soft and sweet, the way I like them best.


Update: The whole dish is that much better once you chop the pork into pieces and mix it all up into one big pile on your plate. Quite delightful and different.

Rating:
3.5

Thursday, March 28, 2013

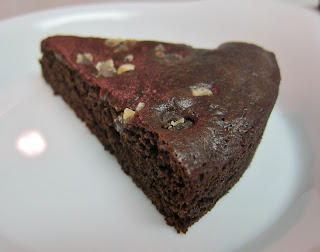
Double-Ginger Cake

Who says ginger cakes are just for the holidays? This version has added fiber thanks to the addition of whole wheat flour, and a double ginger dose between the ground ginger in the batter and crystallized ginger on top. Look for crystallized ginger with raw sugar sprinkles, such as International Harvest.

Ingredients:
  • 1/4 cup packed vegan brown sugar
  • 2 tablespoons canola oil
  • 1 Ener-G egg
  • 1/2 cup molasses
  • 3/4 cup all-purpose flour
  • 1/2 cup whole wheat flour
  • 2 and 1/2 teaspoons ground ginger
  • 1/2 teaspoon baking soda
  • 1/2 teaspoon ground cinnamon
  • 1/2 teaspoon ground allspice
  • 1/3 cup vegan buttermilk*
  • Cooking spray
  • 2 tablespoons chopped crystallized ginger
1. Combine the brown sugar, canola oil, and Ener-G egg in the bowl of a stand mixer; beat at medium speed until blended.  Add the molasses and beat until blended.


2. Lightly spoon both flours into dry measuring cups and level with a knife.  Combine the flours in a bowl with the ginger, baking soda, cinnamon, and allspice.  Add the flour mixture and buttermilk alternately to the molasses mixture, starting and ending with the flour mixture; beat well after each addition.

3. Pour the batter into an 8-inch round cake pan coated with cooking spray.  Tap the pan on the counter once to remove any air bubbles, and sprinkle with the crystallized ginger.


4. Bake at 350 degrees for 25 minutes - the cake should spring back when touched in the center.

5. Cool in the pan on a wire rack for 10 minutes.  Remove from the pan, at which point I recommend serving this cake warm.


*To prepare the buttermilk, place 1 teaspoon lemon juice in a liquid measuring cup. Fill with plain non-dairy milk to equal 1/3 cup, and whisk together.  Let stand for 5 minutes to clabber (sour) the mixture.

Nutrition Info:
8 servings (1 slice), Calories 191

Tasting Notes:
This cake is only subtly sweet, which I quite liked since it let the ginger - in both forms - take center stage. Dense and rich to spoon into, it is definitely best served warm. I wished I had some vegan vanilla ice cream on hand in the freezer, as I think this would have been spectacular a la mode.

Rating:
3.5

Monday, March 25, 2013

Poached Pears with Raspberry-Balsamic Sauce

Earlier in the month, I was delighted to learn my microwave can produce a pretty-darn awesome polenta pudding for dessert, in no time at all. I figured I'd put the little machine to the test again, this time to poach pears for another dessert that cooks in ten minutes.

Ingredients:
  • 2 cups frozen raspberries
  • 1 tablespoon balsamic vinegar
  • 2 teaspoons agave nectar
  • 1/8 teaspoon black pepper
  • 4 firm Bosc pears (about 1 and 3/4 pounds)*
  • 1 tablespoon lemon juice
1. Place the raspberries in a 3-quart casserole dish.  Cover with the lid and microwave for 2 and 1/2 minutes.  Press the raspberries through a fine-mesh sieve over a bowl, reserving the liquid; discard the solids.

Note: The mixture left behind will look a bit like raspberry jam; consider saving the berries for that purpose if you feel inspired.


2. Combine the raspberry juice in a bowl with the balsamic, agave, and black pepper. Alas, my camera couldn't quite capture the vivid red color of this beautiful sauce, but it's simply gorgeous, like liquid red velvet.


3. Peel the pears and rub with the lemon juice.  Place the pears in the casserole dish, and drizzle with the raspberry sauce.  Cover and microwave for 4 minutes.  Stir and spoon the sauce over the pears, then return to the microwave for a final 4 minutes.


Serve 1 pear and 2 tablespoons sauce on each of 4 dessert plates.


*When it comes to the pears, do be sure to choose Bosc. They are slender and - I think - simply the most elegant pear, and will work perfectly in this dessert.


Nutrition Info:
4 servings (1 pear, 2 tablespoons sauce), Calories 239

Tasting Notes:
Well, microwave, if you keep this up, I'm going to start making all my desserts with you, and then this can't really be considered a cooking blog anymore. The pears were - yes - perfectly poached, tender but not mushy, warm and with their natural sweetness enhanced. The sauce disappointed me a bit (although grew on me with each bite) because the balance felt a touch off.  There was a bit too much black pepper, and it needed a splash of lemon juice and a little more agave. Tweak the sauce, and this dessert would be a "5" for sure. Consider some sort of garnish whether green (a mint sprig?) or white (vegan white chocolate shavings?) to cut the monochromatic look of the plate.

Rating:
4

Friday, March 22, 2013

Red Curried Tofu

108 is one of my husband's favorite numbers. It is considered sacred in some religions, representing one, nothing, and infinity (1, 0, 8).  Hindu deities have 108 names; Stonehenge is 108 feet in diameter; freezing water expands by 108%; there are 108 stitches on a Major League baseball. What does all that have to do with this recipe? Nothing, except that without any further ado, I present to you my 108th main dish recipe on this blog.

Ingredients:

  • 1 cup uncooked long-grain rice
  • 2 teaspoons dark sesame oil
  • 2 and 1/2 cups vertically sliced red onion
  • 1 cup yellow bell pepper strips
  • 1 and 1/2 teaspoons curry powder
  • 1 teaspoon ground coriander
  • 1/2 teaspoon ground turmeric
  • 1/2 teaspoon salt
  • 1 tablespoon low-sodium soy sauce
  • 1 tablespoon agave nectar
  • 1/2 teaspoon chile paste with garlic
  • 1 (14.5-ounce) undrained can no-salt-added diced tomatoes
  • 12 ounces lite firm tofu
  • 1/4 cup minced fresh cilantro
  • 1/4 cup chopped dry-roasted cashews
1. Heat the sesame oil in a skillet over medium-high heat.  Add the red onion and bell pepper; saute for 4 minutes.  Stir in the curry powder, coriander, turmeric, and salt; cook for 2 minutes.


2. Drain the tofu and cut into 1-inch cubes.  Add to the pan, along with the soy sauce, agave, chile paste, and canned tomatoes.  Bring to a boil; reduce heat and simmer for 2 minutes.

3. Meanwhile, prepare the rice according to package directions. Spoon 1/2 cup rice onto each of 4 plates, and top each serving with 1 and 1/4 cups tofu mixture.


4. Sprinkle each serving with 1 tablespoon cilantro and 1 tablespoon cashews.

Nutrition Info:
4 servings (1 and 1/4 cups tofu mixture, 1/2 cup rice, 1 tablespoon cilantro, 1 tablespoon cashews), Calories 292

Tasting Notes:
A bite of curried tofu alone is delightful. Add in the tomatoes, rice, cashews, and spices, and that bite becomes awesome. I would simply leave out the yellow bell pepper next time, and would use about half as much onion, but with those changes this might rapidly veer towards a "5." The fresh cilantro on top is so much more than a garnish - a perfect foil to the spiciness of the sauce.

Rating:
3.5

Thursday, March 21, 2013

Grapefruit, Beet, and Blue Cheese Salad

Well, the calendar says it's spring, even if the weather doesn't quite want to believe it. This salad is the perfect type to straddle the seasons, featuring winter produce (roasted beets, citrus), but with a light, fresh springtime presentation.

Ingredients:
  • 12 ounces beets (about 2 beets)
  • 1 and 1/2 cups pink grapefruit segments*
  • 2 tablespoons fresh-squeezed pink grapefruit juice*
  • 1/4 cup crumbled vegan blue cheese (such as Veg Cuisine)
  • 2 tablespoons white balsamic vinegar
  • 2 teaspoons olive oil
  • 2 teaspoons Dijon mustard
  • 1/8 teaspoon salt
  • 1/8 teaspoon black pepper
  • 6 cups torn romaine lettuce
1. Trim the beets, leaving the roots and 1 inch of the stem on each.


2. Scrub with a brush and place in a saucepan.  Cover with water and bring to a boil; cover, reduce heat, and simmer for 35 minutes, until tender.  Drain, rinse with cold water, and drain again.

Note: It's really too bad I'm not crafts-y, otherwise I imagine there's lots you could do with the resulting red liquid from boiling beets - it's practically begging to be used as an all-natural fabric dye.


2. Let the beets cool until you can handle them without burning your fingers.  Trim off the roots and rub off the skins, and cut into 1/2-inch cubes (you'll have about 1 and 1/2 cups).  Set aside.

3. Meanwhile, peel and section 1 and 1/2 cups grapefruit over a bowl. (Yes, grapefruits peel just like oranges, even though we're more accustomed to slicing them in half and digging in with a serrated spoon).


4. Squeeze additional grapefruit sections as needed to obtain 2 tablespoons juice.  Discard the squeezed membranes.

5. Place the blue cheese in a bowl and mash with a fork until smooth.  Add the reserved grapefruit juice, balsamic vinegar, olive oil, mustard, salt, and black pepper, whisking until combined.


6. Pour the dressing mixture over the lettuce and toss gently to coat.  Divide the lettuce evenly among 6 plates (about 2/3 cup per serving).


7. Top each serving with 1/4 cup beets and 1/4 cup grapefruit sections.

*You'll probably need to buy 2 grapefruits to have enough both for whole segments, and additional wedges to squeeze for juice. The original recipe called for three grapefruit, but I would have had leftover sections and/or juice if I purchased three; two should be plenty.

Nutrition Info:
6 servings (2/3 cup lettuce mixture, 1/4 cup beets, 1/4 cup grapefruit), Calories 106

Tasting Notes:
I can't say I've ever had grapefruit and beets together before, but I found the combination - although a touch odd - quite delightful. The overall taste of the salad is a bit too tart, between the vinegary dressing and tart wedges of grapefruit; consider adding agave nectar to the dressing to balance things out a bit. The salad was also wanting for a crunchy element, like walnuts sprinkled on top. But even as is, very light and pleasant.

Rating:
3.5

Update:
If you don't have white balsamic vinegar, you can make this salad with regular balsamic, which I actually did later in the week. The dressing will still taste great; itjust won't be quite as pretty in the bowl:


or over the lettuce leaves:


But you'll still have a fine salad:

Wednesday, March 20, 2013

Breakfast Tortilla Strata

Make-ahead breakfasts are fantastic, not only for a weekend brunch, but also to prep at night so they're ready to go on a busy weekday morning. This one needs at least 8 hours - if not longer - to chill, making it ideal for putting together the night before. Or, if you'd like to eat "breakfast" for dinner, prepare the strata in the late morning and refrigerate until dinner time.

Ingredients:
  • 1 cup bottled salsa
  • 1 cup rinsed and drained canned black beans
  • 10 (6-inch) corn tortillas
  • Cooking spray
  • 1 cup Galaxy Foods Mexican blend shredded cheese
  • 1 cup vegan sour cream
  • 1 cup plain non-dairy milk
  • 1/2 teaspoon salt
  • 1 (12.3-ounce) package lite silken tofu
  • 1 tablespoon cornstarch
  • 1/4 teaspoon ground turmeric (for color)
  • 1/4 cup thinly sliced green onions
1. In a bowl, combine the salsa and black beans; set aside.


2. Cut the tortillas into 1-inch wide strips.  Arrange one-third of the tortilla strips in the bottom of an 11x7-inch baking dish coated with cooking spray, and sprinkle with 1/3 cup cheese.


3. Spread with half of the salsa mixture (about 1 cup), and then repeat the layers: one-third tortilla strips, 1/3 cup cheese, and the remaining salsa mixture, topped by the final one-third tortilla strips.

4. In a food processor, combine the tofu, cornstarch, and turmeric and process until blended.  Transfer the tofu mixture to a bowl and whisk with the sour cream, milk, and salt.  Stir in the green onions.

5. Pour the tofu mixture over the strata, and sprinkle with the final 1/3 cup cheese.  Cover and chill for at least 8 hours and up to overnight.


6. Remove from the fridge and let stand for 10 minutes.  Bake, covered, at 350 degrees for 20 minutes.  Uncover and bake a final 15 to 20 minutes.  The top should be lightly browned and the tofu mixture should be set.


I recommend serving a citrus compote on the side:


Or, for something simpler, fresh fruit like cubed cantaloupe is also great:


Nutrition Info:
6 servings (1 portion), Calories 292 

Tasting Notes:
Savory and filling, and I was pleased with how the tofu mixture set. I definitely recommend more black beans and more salsa, but loved the way the tortilla strips soften and plump up after soaking for 8 hours. I'd leave out the green onion next time, and also play around with spices (onion powder comes to mind) to heighten the flavor of the tofu mixture.  This was my first time using Galaxy's shredded cheese, and I was very impressed with how well this vegan cheese melted and stretched in the oven.

Rating:
3.5

Update:
If you can't find Galaxy's Mexican shreds, try this strata with one of the vegan Monterey Jack cheeses on the market, like Vegan Gourmet or Daiya (I used the former). I liked that this version was a little less greasy.


I also used the opportunity to bake an extra 5 minutes, uncovered, resulting in an even better-set tofu mixture on top.

Tuesday, March 19, 2013

Sauteed Mushrooms with Porcinis

The title of this recipe made me laugh with its redundancy (what are porcinis, if not mushrooms?) but it's a nice mix of the fresh button mushrooms and the concentrated flavor of dried porcinis.  If you have leftover porcini mushrooms after this recipe, they are beautiful in everything from risotto to pasta sauce to stew.

Ingredients:
  • 1 cup dried porcini mushrooms (about 1 ounce)
  • 1 cup water
  • 1 tablespoon olive oil
  • 2 minced garlic cloves
  • 2 tablespoons minced flat-leaf parsley
  • 2 (8-ounce) packages presliced button mushrooms
  • 1/2 teaspoon salt
  • 1/4 teaspoon black pepper
1. Combine the porcini and water in a bowl; cover and let stand for 15 minutes.  Drain the mushrooms through a sieve over a bowl, reserving the liquid.


2. Combine the olive oil and garlic in a large skillet over medium-high heat; saute just until the garlic starts to sizzle. 

Note: As with my Spaghetti Alla Norma, this step will only take 30 seconds to 1 minute - the trick here is not to overcook the garlic.

3. Add the porcinis, the reserved soaking liquid, and the parsley; cook until the liquid is evaporated - about 15 to 20 minutes.


4. Add the button mushrooms, salt, and black pepper; cook for a final 15 to 25 minutes, until the liquid has evaporated.

Gardein's beefless tips are a savory counterpart to serve with this side dish, and I highly recommend a glass of (vegan) Chianti or other vegan red wine.


Nutrition Info:
6 servings (1/2 cup), Calories 55

Tasting Notes:
This dish was almost the definition of "earthy" - just rich, concentrated flavor of both mushroom varieties, feeling like they were freshly dug up from the ground. If I hadn't cooked this myself, I would never believe the dish is really little more than the mushrooms and their own juices - certainly it tastes rich enough to have a little red wine in the sauce, or broth, or both. I would increase the parsley next time, to freshen the taste up a bit, but otherwise found this to be quite nice.

Rating:
3

Monday, March 18, 2013

Chicken, Artichoke, and Tomato Ragout

If the late winter weather has you down, this hearty ragout should cheer you right up.  Canned tomatoes and frozen artichoke hearts are a nice little way to cheat and sneak spring flavor onto your plate, even before spring officially arrives.

Ingredients:
  • 3 Gardein Tuscan chicken breasts (without sauce)
  • 1/4 teaspoon black pepper
  • 1 tablespoon olive oil
  • 1 cup coarsely chopped onion
  • 2 minced garlic cloves
  • 1 cup vegan chicken broth (such as Imagine)
  • 1/4 cup vegan dry white wine 
  • 3 tablespoons tomato paste
  • 1/2 teaspoon dried basil
  • 1 (28-ounce) undrained can diced tomatoes
  • 1 bay leaf
  • 1 (9-ounce) package frozen artichoke hearts
1. Heat the olive oil in a Dutch oven over medium-high heat.  Cut the chicken into bite-sized pieces and sprinkle evenly with the black pepper.  Add to the pan, along with the onion and garlic; saute for 6 minutes.


2. Stir in the broth, white wine, tomato paste, basil, canned tomatoes, and bay leaf.  Bring to a boil.  Reduce heat and simmer for 20 minutes, until thick, stirring occasionally.


3. Stir in the artichoke hearts and cook for a final 5 minutes.

Note: No need to thaw the artichokes first; the frozen veggies will cook quite quickly in the warm stew.

4. Discard the bay leaf before ladling the ragout into bowls.

Nutrition Info:
4 servings (1 and 1/2 cups), Calories 252

Tasting Notes:
Easy and all-purpose, but a little bland. Certainly increase the dried basil, and consider adding other herbs or spices into the mix. A little lemon juice would brighten up the broth in a nice way, and the stew is missing a salty or briny element. But if you like artichokes and Gardein chicken, you'll still enjoy this dish.

Rating:
3